Twitter
RSS

Overhaul!

0
I've had this blog for a while. Early this year, I also had a podcast. This blog was created to supplement the podcast with more detailed explanations of certain topics. However, the podcast took too much time to produce (I was on an old, old Dell Dimension 3000 with 512MB of RAM. Try encoding H.264 on that dinosaur) and lost it's luster after the 2 episodes.

I then try to reformat it as an actual weblog, which also fell through. Every now and then a post would go up, to what I would assume is empty ears. I really would like to change this. I'm definitely not going to promise regular posts, but I really, really going to try to post more often.

What will help is a slow overhaul of the site. I like the layout, but that might change. I'll slowly be making other small changes throughout, so look out for it!

How to shine shoes to a mirror finish

3
Part of my NJROTC career is to wear the uniform. That also means keeping our shoes shiny. Looking at the cadets on top staff, we all felt mediocre at first, until we all branched out in our own ways to get our shoes to a mirror finish, which is ideal. Some techniques I've heard are melting the polish, heating the polish after applying it with a steam iron, etc. The technique I use is the one that I've felt to be the best, and to produce the best results. The only drawback is that the first time it takes a LONG time, but the results are soon reaped when you find it takes only minutes to return your shoes to a fantastic luster. I'd recommend taking a free Saturday for this, because depending on the dullness of your shoes and how shiny you want them, this could take several hours.

Note: This is only on how to polish black shoes. The same technique *should* work on brown shoes, but I have not tested it. Do so at own risk.
Also, I can't post pictures right now, since I just got done polishing my shoes, and can't exactly show you the procedure =P

What you'll need:

* An old T-shirt
* A pair of scissors
* Kiwi Brand Black Wax Polish (the stuff that comes in a tin, not liquid polish)
* Kiwi Brand Neutral Wax Polish (again, in a tin)
* A small glass of water frozen to the point that there's a thin layer of ice on top (the freezing is optional if you're short on time, but recommended)
* A cotton pad (the kind that comes in this, or a makeup remover pad. If you get the little kit, I would still recommend a larger tin of black polish, since the polish in the little tin tends to break easily)
* Dull, black dress shoes
* Some old clothes to put on, if you're messy

Method:

1a.. Put your cup of water in the freezer for roughly 1hr-1.5hrs. Check regularly after an hour, since you do not want a thick layer of ice. Again, this is optional if you're short on time, but it speeds up the process a bit.

1b. While the water is freezing, gather your supplies. Cut a strip out of the t-shirt roughly 1ft long and about 4in wide. Put away the scissors and the remaining t-shirt.

2. When the water has the little layer of ice, remove from the freezer, and sit somewhere that's comfortable and has a side table. Put your supplies on the table.

3. Here's where it gets a bit time-consuming, especially if the shoes are new or haven't been polished. Take a shoe and set it on your lap. Open your black polish. Take your cotton pad, and pick one end or a new makeup removal pad. Put the end over the index and middle fingers of your dominant hand, and make three little circles in the polish. It really doesn't take much. Crack the ice with your polish fingers so the the cloth with the polish is barely damp. Cover the first third of the shoe (the tip) with polish so it looks really dull. Wait 5-10min. Tightly wrap your t-shirt strip, like you were wringing out a wet cloth, and buff the polish until you can't see polish.

4. Repeat. You'll know you're done when you can't see what's called orange peel. Orange peel is the texture on the shoes that haven't built up layers of shine. When you can't see any orange peel, not even the faintest bit, on the tip of the shoe, you can move on.

5. Take the other end of the cotton cloth, or a new makeup removal pad, and repeat step 3 with the neutral polish. This protects the black polish's shine, while making it like obsidian. Continue until you have a shine you like.

6. This step depends on what you want to do. Our inspecting officers only require the tip be shined, so this is where I start the next shoe. If you're shining dress shoes, keep moving down the front of the shoes, only doing a bit of a shoe at a time, until you reach the laces. After that, shining the rest is a bit of a waste of time, unless you have nothing better to do, or are stressed. Shining shoes is quite Zen for me.

7. If you shined the rest of the front of the shoe, start the next one. Repeat steps 3-5 until the next shoe is comparable.

There, you're done. Chances are, unless you're in the military, have shined shoes before, or own Corframs, you're holding the shiniest shoes you've ever had. Congratulations, now go impress your peers =).

If you notice in a few hours that your shoes have lost some luster, panic not. Apply 1-2 more coats of neutral polish without water, and you should be ready to go!

Lots and lots of stuff to do...

0
Yeah, every time I post I usually insert a blip about posting more. And I never do. But usually it's because something completely random comes up that screws up my planning, and I don't get around to this for like...a month and some odd days. School is one of those things. Whereas I didn't post in the summer because I'm lazy, I don't post now because I have lots of things to do, like homework, and JROTC. They suck up lots of time. Then I have to keep up with tech news, with RSS feeds and websites, then family, friends, etc, and then I have no time. School's pretty tough. I'm not going to say that I'm going to regularly post, because I can't guarantee that. I'll try my darnedest to.

So anyway, there's a JROTC meet that I'm going to on Saturday, and homecoming the same day, so I guess I'm excited. That's pretty much all that's been happening.

Tschau!

Productivity

0
Ok, I promise I'm going to try to get into the regular habit of posting.

Now on to the actual point of this article. Productivity. For me at least, it's hard to get into the habit of actually being productive, but once I get there, it's hard to shake me. I like getting stuff done, even if it doesn't look like I do. And, thankfully enough, it takes getting stuff done to be able to consistently get stuff done. Today, I'm going to explore how I get stuff done easily and quickly. I'll be looking into how I've setup my browser window (Mozilla Firefox 3.5.2, and occasionally Mozilla Minefield {aka Firefox 3.6a1pre, the edition before alpha}), iTunes, and desktop for maximum (or, close enough) productivity!

First off, Firefox. Since the release of Firefox 3, it has been my main browser, occasionally handing off that title to Google Chrome, if only for the need of a faster browser. And, over time, I've collected add-ons to ease my use and increase productivity. Of these, my most used are:

Tiny Menu
Personas with the Evolution skin
downThemAll!
Del.icio.us
Test Pilot
Google Redesigned
Greasemonkey/Greasefire
Jetpack
PermaTabs Mod
Better Gmail 2
Better Greader
FaviconizeTab
and TwitterFox

All of these, and more, are here at my Collections page: http://bit.ly/b6GT3

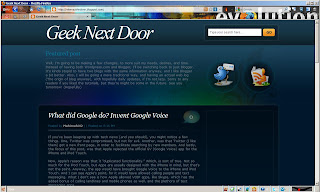
In fact, here's a screenshot of my exact setup!


Want to recreate it? Ok, at bear minimum, for the top two taskbars (where my tabs and the Awesome Bar are), you need:

Tiny Menu
downThemAll!
Del.icio.us
PermaTabs Mod
Better Gmail 2
Better Greader
Greasemonkey
FaviconizeTab
and Personas with the Evolution skin

1. Well, it's actually quite simple to put together. First off, watch this video by mobilephone2003 on YouTube on how to maximize screen space: http://bit.ly/4q4pPz (Up to about 3:30)

2. Now, install the rest of the add-ons!

3. Drag the dTA One-Click and Del.icio.us icons from the toolbar config window (where you selected use small icons) to their respective areas.

4. To have the permanent Gmail, Greader, and Google Voice icons, follow these helpful Lifehacker articles: http://bit.ly/1MDxz0 and http://bit.ly/103Bj

And there you go!

Now, on to my iTunes window. I like music, but I really don't have a lot (only 400 songs exactly). In addition to music, I like podcasts. Currently, I'm subscribed to 3 (technically 5, but one is defunct and the other was to watch one video.), HD Nation, MAKE Magazine, and tWiT. Luckily, iTunes already organizes my content for me. But I like to go one step further and make playlists for certain functions.


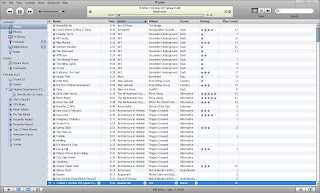
As of now, I have 3 playlists. The first, Awesome Sauce (I'm a Hak.5 fan, what can I say.), is all my favorite songs that I like to listen to often (58 songs at the moment). The next two are special. When I get a new album, I like to listen to each song once, so I can rate them. The two now are Chroma by Cartel and Ganging Up On the Sun by Guster. That way, I can zoom through my music and have everything really, really organized. Do note that I really just started organizing my music, and most hasn't gotten a rating, and some haven't been played. I am working on it though.

And finally, my desktop. Unfortunately, I have to use our laptop, so I can't obtain a screenshot, but it's easy enough to explain. The monitor I use gives me a decent 1600x1200 resolution, so you'd think, lots of space, lots of icons, right? Wrong. I set my taskbar to the top, and used Start Killer to get rid of the Start button. On the bottom, I use RocketDock with an OS X Leopard skin (I'm a proud Applegeek), with an icon to all programs, Recycle Bin, and My Computer. I have no icons on my desktop, proudly. While I save everything that gets downloaded to my Desktop, it all gets processed ASAP to where it has to go.

Well, I hope this post has shown you how I achieve productivity, and some ways you can as well. Please comment, subscribe in your favorite RSS reader, follow me on Twitter, and tell your friends!

What did Google do? Invent Google Voice

0
If you've been keeping up with tech news (and you should), you might notice a few things. One, Twitter was compromised, but not for evil. Another, was that Twitter (I like them) got a new front page, in order to facilitate searching by new members. And lastly, the focus of this post, was that Apple rejected the official GV (Google Voice) app for the iPhone and iPod Touch.

Now, Apple's reason was that it "duplicated functionality." Which, is sort of true. Not so much for the iPod Touch, but Apps are usually designed with the iPhone in mind, but that's not the point. Anyway, the app would have brought Google Voice to the iPhone and iPod Touch. And I can see Apple's point, for it would have allowed calling people and text messaging. What I don't see is how Apple allowed VOIP apps, like Skype, which has the added bonus of calling landlines and mobile phones as well, and the plethora of text messaging apps.

(On an unrelated note, if you own an iPod Touch, purchase the Apple microphone headphones and get those apps. It's all the pleasures of an iPhone, without the hassle of an expensive plan ;P)

I'm sure Google will find a way to add a mobile version of Google Voice, so you can access it with any phone with web capabilites. But alas, unless you jailbreak your iPhone/iPod Touch with Cydia and download the unofficial app, there is no GV App goodness for you.

And to sorta go off track, I recieved a Google Voice invite! Now I just need my new phone to actually come in the mail. I think I'll really enjoy the transcribing of voicemails.

So, until next time,
Mahimahi42

Social Networking And Web 2.0 Are Awesome.

0
Well, if you had the ability to look on my Ping.fm Dashboard, you would see a plethora of social networks I belong to. But, since you don't, they are: Twitter, Facebook, AIM, GTalk, MySpace, Identi.ca, FriendFeed, Blogger (really?!), Del.icio.us, Flickr, Radar, and Photobucket. A nice little collection, no? And it's all built on the idea of Web 2.0. Wikipedia defines Web 2.0 as:

"Web 2.0" refers to the second generation of web development and web design. It is characterized as facilitating communication, information sharing,interoperability, user-centered design[1] and collaboration on the World Wide Web. It has led to the development and evolution of web-based communities, hosted services, and web applications. Examples include social-networking sites, video-sharing sites, wikis, blogs, mashups and folksonomies.

Since the dawn of human evolution, we have been social creatures. As time when on, we became closer, with the advent of settling down, villages, towns, cities, and political states. However, we as a species were still locked by travel time. The Internet soon changed that. It allowed almost instanteous communication with anyone in the world, but still it was...young.

But now, we can link with almost anyone in the world, almost 6.8 billion people. There's something quite humbling about that, to be honest. When my Facebook friend additions started to slightly peeter out, a conference I attended fixed that! While I knew those people for only 10 days, social networking has allowed me to stay in connected with them!

And now, with blogs (like this one), YouTube, Last.FM, Flickr, Radar, multimedia sharing has been added to the thick soup of Web 2.0.

I would say much more, but I'm really tired. Tomorrow, perhaps?

A Change

0
Well, I'm going to be making a few changes, to more suit my needs, desires, and time. Instead of having both Wordpress.com and Blogger, I'll be switching back to just Blogger. It's kinda stupid to have two blogs with the same information anyway, and I like Blogger a bit better.

Also, I will be going a more traditional way, and having an actual web log (The origin of blog anyway), with hopefully daily updates, if I'm not lazy.

Sorry to any readers if you liked the tutorials, but they're might be some in the future.

See you tomorrow! (Hopefully)